Safe Ways to Clean Dust From Your PC Case and Fans
Maintenance keeps your PC running cool and extends component life, and you can safely remove dust with the right tools and technique. You’ll learn how to power down, ground yourself, use compressed air or soft brushes, clean filters and fans without bending blades, and avoid liquid cleaners and excessive force so your system remains reliable and quiet.
Safety Preparations
To power down and unplug your PC completely before you begin, press the case power button once to drain residual charge and allow components to cool; gather basic tools like a soft brush, microfiber cloths, canned air, and an anti-static wrist strap or mat so you can work methodically. To protect both yourself and the hardware, clear a stable workspace, keep liquids and food away, and organize small parts in labeled containers to avoid losing screws or mixing components.
Preventing electrostatic discharge and using PPE
Above all, ground yourself before touching internal parts by using an anti-static wrist strap clipped to the PSU chassis or by frequently touching an unpainted metal part of the case; avoid working on carpeted floors or in very dry environments that raise static risk. You should handle boards and cards by their edges, store removed components on anti-static bags or mats, and keep replacements and internal connectors away from conductive surfaces.
You should remove jewelry and loose clothing that can catch on fans, wear a dust mask and eye protection when using compressed air, and consider light nitrile gloves to limit oils on contacts while maintaining dexterity; avoid wool and high-static synthetic garments that can generate charge.
Creating a safe, well-lit workspace
using a stable, flat work surface at a comfortable height, place your PC case on an anti-static mat or a clean towel to protect finishes; arrange a small tray or magnetic screw holder for fasteners and keep tools within reach to avoid overreaching or dropping parts. You should position your case so you can easily access the interior panels and components without twisting or stretching.
You should set up bright, focused lighting such as an adjustable LED task lamp to eliminate shadows inside the case, and position the lamp behind your shoulder so it doesn’t blow dust into your face when you use compressed air; good ventilation helps remove airborne dust and fumes.
Hence you may want to use a clamp-on lamp, a small vacuum with a HEPA or dust-rated filter for nearby cleanup, and a magnifying loupe or phone camera to inspect tight areas; keep the workspace free of drinks and food, and keep children and pets out of the area while you work.
Tools and Materials
It lists the basic items you should have before you open your PC: a can of compressed air or a low-pressure electric blower, soft anti-static brushes, microfiber cloths, an anti-static wrist strap, a set of screwdrivers, and a small container for screws. You should also have isopropyl alcohol, cotton swabs, and distilled water for targeted cleaning, plus a well-ventilated, static-safe workspace so dust doesn’t resettle on your components.
Recommended cleaning tools (compressed air, brushes, microfiber)
An effective toolkit centers on a can of compressed air or a low-speed electric blower to remove loose dust, a soft anti-static brush to dislodge stuck particles without scratching, and several microfiber cloths to wipe panels and fan blades. You should use short bursts of air while preventing fans from overspinning (hold blades gently), keep brushes and cloths clean, and work systematically from top to bottom so you don’t redistribute debris.
Safe cleaning agents and what to avoid
Around liquids, choose isopropyl alcohol (ideally 90% or higher) applied sparingly with a lint-free swab or cloth for greasy residues, and use distilled water for light wiping; never pour or spray liquids directly onto components. You should avoid household cleaners, window sprays, bleach, acetone, and oil-based products because they can leave conductive or corrosive residues, degrade plastics, or strip coatings.
avoid using aerosol sprays that contain solvents or canned-air substitutes with propellants that leave residue, and don’t run a vacuum inside the case; instead use a low-pressure blower outside the case or hold a vacuum at a safe distance to collect debris, and make sure you let alcohol-cleaned parts dry completely before you reassemble to prevent trapped moisture on sensitive electronics.
Power Down and Access
Some simple, deliberate steps at this stage reduce the risk of electrical damage and make cleaning safer and faster. Shut down the operating system completely – do not rely on sleep or hibernate – and wait until all LEDs are off and fans have stopped spinning before you touch the case.
After the system is off, unplug the power cord at the outlet and disconnect external devices so nothing can supply power while you work; for desktops flip the PSU switch to off, and for laptops unplug the charger.
Proper shutdown, unplugging, and battery precautions
Before you open the case, perform a full shutdown using your OS command and wait 30-60 seconds for residual charge to dissipate; verify that indicator lights and fans are inactive. Avoid quick reconnections or attempting to service while the system is in a low-power state.
Unplug the mains cable and any peripherals, then switch off the PSU at the back of a desktop. If you work on a laptop with a removable battery, take it out; if the battery is internal, consult the manufacturer’s guidance before attempting removal, and otherwise ensure the device is fully powered down and unplugged.
Removing panels and organizing screws/cables
At the chassis, ground yourself by touching the metal frame or using an anti-static wrist strap, and place the case on a stable, well-lit surface. Remove side panels by loosening thumbscrews or standard screws, and immediately store those fasteners in a small container or magnetic tray so they don’t get lost.
Handle panels and fans gently – hold fan frames, not blades – and unplug fan connectors from headers before moving components. Take photos of cable routing and label front-panel and power connectors so you can restore everything to its original positions without guesswork.
In addition, sort screws and small parts into labeled resealable bags or compartments (for example, “side panel,” “fan,” “standoffs”), keep removed panels on a soft cloth to avoid scratches, and use zip ties to keep cables clear of fan blades during cleaning and reassembly.
Cleaning Fans
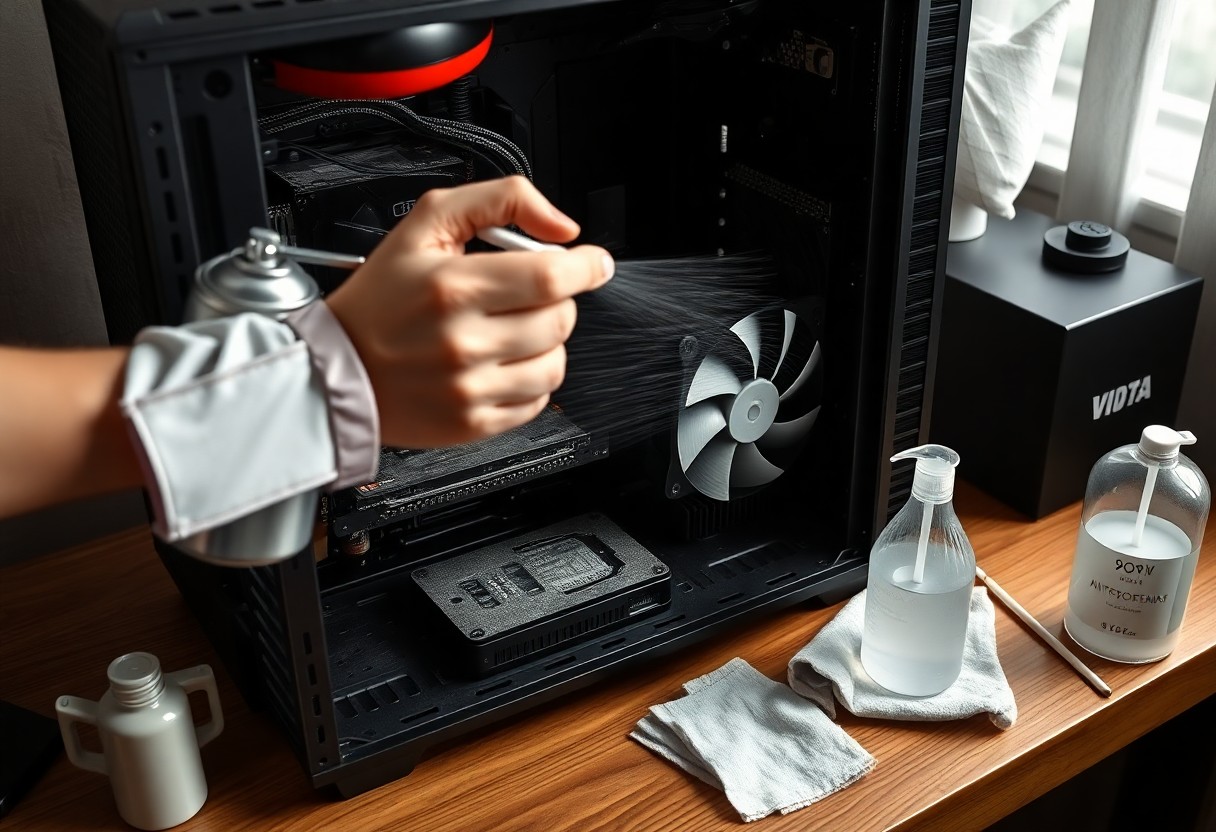
For safe fan maintenance you should power down and unplug your PC, then ground yourself to avoid static; use a can of compressed air in short bursts while holding each blade to prevent freewheeling and potential bearing damage.
You can remove fans for easier access, lay them on a soft cloth, and use a soft brush or microfiber to dislodge clinging dust before using air; avoid spraying cleaning fluids directly onto motors or circuits and let any damp cloth fully evaporate before reinstallation.
Cleaning fan blades and frames without damage

Along the blade edges and the frame you should start with dry methods: compressed air and a soft brush to knock loose dust, then a microfiber cloth for gentle wiping; hold the hub to stop rotation and protect the bearings while you clean.
If sticky residue remains, you can dampen a lint-free cloth with a small amount of 90%+ isopropyl alcohol and wipe blades and frame carefully, avoiding excess liquid near the motor and electronics; do not use abrasive pads or household cleaners that can scratch or strip coatings.
Cleaning bearings, fan hubs, and reinstalling correctly
Across the hub and bearing area, you should avoid forcing the fan to spin; if the fan has a removable sticker or cap, remove it to access the bearing and clean gently with a cotton swab lightly moistened with isopropyl alcohol to dissolve grime, then allow to dry completely.
You can apply a drop of light machine oil or specialized fan oil only if the design allows and the manufacturer suggests it; reinstall the fan using the original mounting orientation and anti-vibration hardware, reconnect power and perform a brief test at low speed before closing the case to confirm smooth operation.
Indeed, if a bearing shows persistent noise or resistance after cleaning and lubrication you should replace the fan rather than risk system instability; keep screws and connectors in the correct order and route cables to avoid rubbing the blades, and note the fan model and orientation for future maintenance.
Cleaning Case Interior and Filters
Keep your PC unplugged and placed on a nonconductive surface before you open the case; ground yourself by touching the case or using a wrist strap. Use short bursts of compressed air from about 6-8 inches away, a soft-bristled brush for stubborn areas, and a low-power vacuum only outside the case to collect dislodged dust; avoid spraying liquids on components and never tilt a compressed-air can while spraying.
Dust filters, vents, and intake/exhaust cleaning
Interior dust filters should be removed and rinsed with lukewarm water and mild soap, then air-dried completely before reinstalling to prevent moisture damage. For vents and intake/exhaust openings, use short compressed-air bursts aimed to push dust out of the case rather than deeper in, and follow with a soft brush to clear trapped debris; foam or fabric filters can be gently squeezed to remove water and laid flat to dry.
Cleaning heatsinks, PSU exterior, and cable surfaces
Behind heatsinks, hold fan blades steady to prevent overspin and blow air through the fins from the rear to the front to dislodge dust; use a soft brush to work out packed particles but avoid probing between fins with metal tools. Clean only the PSU exterior and grille-do not open the PSU-using short air bursts and a dry microfiber for the outer casing, and wipe cable surfaces with a dry or lightly damp microfiber cloth while keeping moisture away from connectors.
The safest technique is to work in a low-static area, keep compressed-air cans upright, limit bursts to avoid cold spray, maintain distance to protect delicate components, and ensure all filters and parts are fully dry before reassembly; after closing the case, power on and confirm fans spin freely and temperatures are within normal ranges.
Preventive Maintenance and Airflow Optimization
Not letting dust accumulate preserves cooling performance and reduces thermal throttling; you should keep intake filters clean, maintain unobstructed air paths, and use low-static tools when you clean so debris isn’t forced deeper into the system.
Reassembly, fan orientation, and cable management for airflow
Reassembly is the moment to verify fan orientation-set front and bottom fans as intakes and top and rear fans as exhaust to establish a clear front-to-back flow; secure fans with screws or rubber mounts to reduce vibration, and route cables behind the motherboard tray, bundling and tacking them away from intake paths so they don’t create turbulence or block airflow.
Maintenance schedule, dust-prevention tips, and upgrades
Maintenance should follow a predictable cadence so you can address dust before it impacts performance: light checks monthly, deeper cleanings every 3-6 months, and full inspections annually or after especially dusty events.
- Monthly: inspect and clean external filters and vents; use a brush or low-power vacuum from outside the case.
- Every 3-6 months: open the case, blow dust from fans and heatsinks with short bursts of compressed air or a soft brush, and clean crevices.
- Annually: check thermal paste, clean PSU and case fans thoroughly, and replace worn fans or filters as needed.
Recognizing rising idle temperatures or persistent fan noise lets you act before components run hot or fail.
In addition you can reduce dust buildup and improve long-term airflow with a few environmental and hardware choices:
- Keep the PC off the floor and away from carpets or heavy foot traffic.
- Use positive pressure (more intake than exhaust) and washable or magnetic filters on intake fans.
- Consider cases with dust filters, sealed cable-routing channels, and removable filter access for easier cleaning.
Recognizing early warning signs like increasing fan speed at idle or thermal spikes helps you schedule targeted maintenance and upgrades before they affect stability.
Conclusion
To wrap up, when you clean dust from your PC case and fans you should power down and unplug the system, discharge static by touching the metal chassis or using an anti-static wrist strap, and use canned air or a soft brush in short bursts while holding fan blades to prevent spinning. Work in a well-ventilated area, avoid spraying liquids directly on components, and use isopropyl alcohol sparingly on a lint-free cloth for stubborn grime.
Following these safe practices on a regular schedule-more often if you have pets or heavy dust-will help keep your temperatures lower, reduce fan noise, and extend the life of your components; after cleaning, reseat panels and connections and test your system to ensure everything runs smoothly.


